Deployment Automation with Google Cloud Build and Nitric
This guide will demonstrate how Nitric can be used, along with Google Cloud Build, to create a continuous deployment pipeline. The actions in the example below target Google Cloud, but can be modified to target AWS or Microsoft Azure.
This guide assumes basic knowledge about Google Cloud Build. If you're unfamiliar, it's recommended to go through Google's Cloud Build docs first.
Configuration
To begin you'll need a Nitric project ready to be deployed. If you haven't created a project yet, take a look at the quickstart guide.
Next, we'll add a Google Cloud Build configuration file to the project. This is where you'll configure the deployment automation steps. Create a yaml file cloudbuild.yaml at the root of your project.
The Cloud Build configuration file below is a sample, to show you how to install the Pulumi CLI, Nitric CLI and run a nitric deployment as part of your CI/CD workflow.
Note: The _PULUMI_ACCESS_TOKEN substitution is a simple way to specify the token, but you should consider using encrypted variables.
steps:- name: 'docker:27'script: |# Update package list and install required packagesapk update && apk add --no-cache curl bash# Start Docker daemon with TCP socket on port 2375 and without TLS# This makes Docker accessible over TCP for other commands to interact withdockerd --host tcp://0.0.0.0:2375 --tls=false --log-level=error &# Wait until Docker daemon is fully started and responsive# This loop checks if Docker is up by querying its version endpointuntil curl -s http://127.0.0.1:2375/version; doecho "Waiting for Docker daemon to start..."sleep 1done# Install Pulumi by downloading and executing the installation script# Pulumi is a tool for managing infrastructure as codecurl -fsSL https://get.pulumi.com | shexport PATH=$PATH:$HOME/.pulumi/bin# Install Nitric by downloading and executing the installation scriptcurl -L https://nitric.io/install?version=latest | bashexport PATH=$PATH:$HOME/.nitric/bin# Execute the Nitric command to deploy infrastructure# --ci flag is used for continuous integration environmentsnitric up --ci# Environment variables to configure Pulumi accessenv:- 'PULUMI_CONFIG_PASSPHRASE=${_PULUMI_CONFIG_PASSPHRASE}'- 'PULUMI_ACCESS_TOKEN=${_PULUMI_ACCESS_TOKEN}'# Set DOCKER_HOST to point to the Docker daemon started earlier# This allows the docker CLI commands to communicate with the daemon- 'DOCKER_HOST=tcp://127.0.0.1:2375'# Set logging option to only log to Google Cloud Loggingoptions:logging: CLOUD_LOGGING_ONLY
Setup build triggers
A Cloud Build trigger will start a build automatically whenever changes are made to your source code. You have the flexibility to configure the trigger for all changes in the source repository or for specific criteria. Learn more about creating triggers.
The below config will trigger the build each time there's a commit to the main branch.
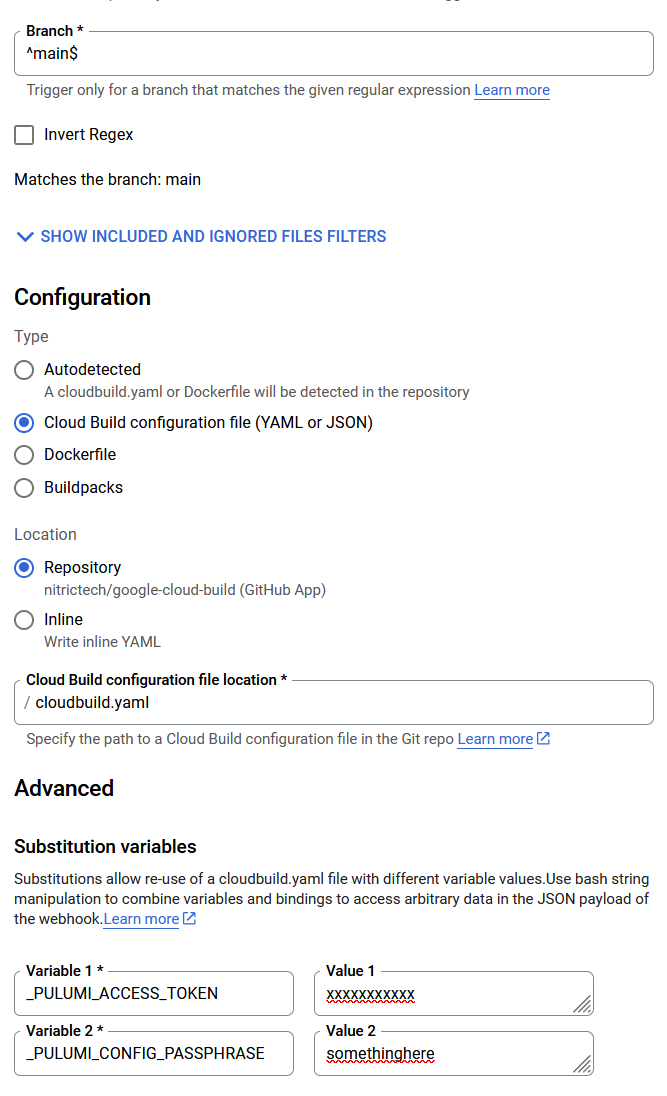
In the above configuration, both _PULUMI_ACCESS_TOKEN and _PULUMI_CONFIG_PASSPHRASE are substitutions configured in Cloud Build Triggers. Learn more about creating and managing build triggers in the official documentation.
-
PULUMI_ACCESS_TOKEN
- You can get a pulumi access token by logging into Pulumi on the browser and going to your profile settings. Under the 'Access Tokens' tab click 'Create token'.
-
PULUMI_CONFIG_PASSPHRASE
- For interaction free experiences, Pulumi also requires a passphrase to be configured. Your passphrase is used to generate a unique key which encrypts configuration and state values.